Call Other Agents
Open in CMSIn this tutorial you connect another agent to yours, so your agent can hand it a question and use the reply in its own answer. You will paste the other agent's share link, review what it can do, add its key, and test the hand-off in Preview.
Before you start
-
Read Work With Other Agents to understand the outbound and inbound directions.
-
You have two things from the owner of the other agent:
- its share link (the agent card URL), and
- a key that lets your agent connect.
If the other agent is a qlar agent, its owner finds the share link on Channels → Agent-to-Agent and creates the key on Channels → Agent Keys. If you own both agents, follow Let Other Agents Call Yours on the other agent first.
-
You have Owner or Contributor access to your agent.
Scenario used in this tutorial
| Value | |
|---|---|
| Your agent | Front Desk, a public agent that answers patients |
| Agent you connect | Pharmacy, an internal agent that knows medicine stock per branch |
| Share link | https://<pharmacy-service>/a2a/<pharmacy-agent>/card (you get the real link from the Pharmacy owner) |
| Goal | When a patient asks about stock, Front Desk asks Pharmacy and passes on the answer |
Step 1: Open Other Agents
In your agent's left sidebar, open Tools → Other Agents.
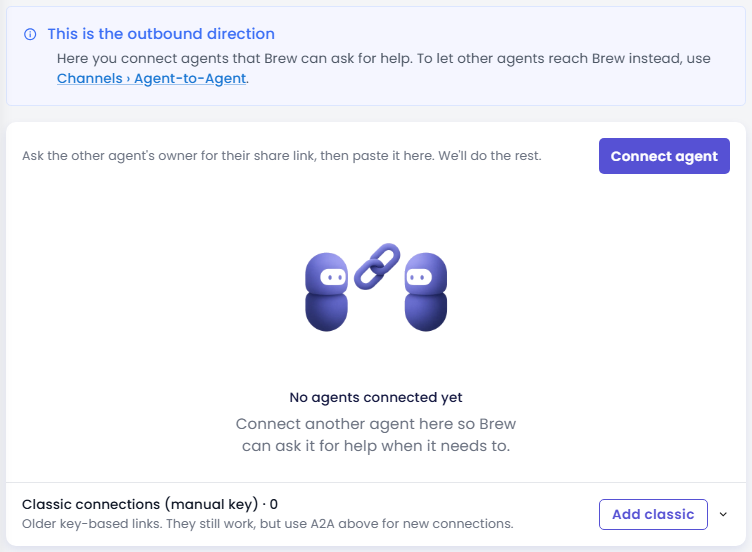
A blue box at the top reads This is the outbound direction: this page is for agents that your agent can ask for help. If no agent is connected yet, you see No agents connected yet.
Step 2: Fetch the other agent's card
- Click Connect agent. A panel opens on the right.
- Paste the share link into Agent card URL. It must start with
http://orhttps://. - Click Fetch card.
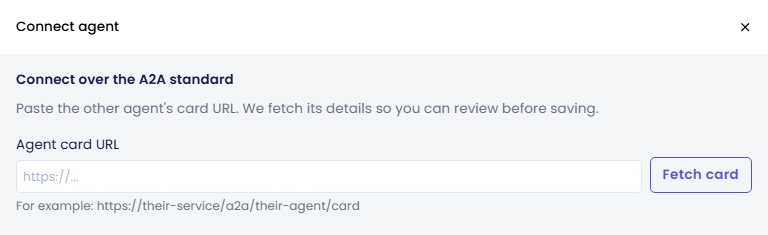
qlar reads the other agent's card and fills in the form for you. If something is wrong, an error appears under the field, for example "Could not reach that card URL. Check it and try again." Check the link with the other agent's owner. For a qlar agent, the link only works once that agent has Reachable by other agents turned on and has been published.
Step 3: Review the details
After the card is fetched, check these fields:
| Field | What to do |
|---|---|
| Name | The name shown for this agent. Keep it, or rename it to something your team recognises. |
| Description | What this agent does. Your agent reads this to decide when to call it, so make sure it is specific. For example: "Checks medicine stock and prices at each hospital branch." |
| Skills this agent advertises | A read-only list from the other agent's card. Click See N more to see them all. |
Step 4: Add the key
The Auth Type is pre-selected from what the card advertises. For a qlar agent this is Bearer: paste the key you received from the other agent's owner into Key.
If the other agent uses a different method, choose it in Auth Type and fill in the fields that appear. The options are the same as for API tools, see Set Authentication.
Step 5: Write usage rules (optional)
Use Usage rules (optional) to tell your agent when to call this agent, or how to use its replies. For example:
Call this agent only for questions about medicine stock or prices. Tell the patient which branch the information is for. Never mention that you asked another agent.
Step 6: Add the agent and save
- Click Add agent at the bottom of the panel. The agent appears in the list with an A2A badge.
- Click Save all changes at the bottom of the page and confirm. You should see Connected agents successfully updated!
To change a connected agent later, click its row; to remove it, click its delete icon. Then click Save all changes again.
Step 7: Test in Preview, then publish
- Open the Preview and ask something only the other agent can answer, for example: "Is amoxicillin in stock at the Kemang branch?"
- Your agent should call the connected agent and answer with its information.
- When you are happy, click Publish at the top of the CMS so live users get the new connection. See Preview and Publish Changes.
If your agent answers without calling the other agent, make the Description and Usage rules more specific about when to use it.
Classic connections (manual key)
Below the A2A list, a collapsible section Classic connections (manual key) holds older key-based links. They still work, but the classic method is pending sunset: use Connect agent for anything new.
If you must add one, click Add classic and fill in:
| Field | What to enter |
|---|---|
| Action Name | A short, unique name, for example ask_pharmacy |
| Agent Code | The other agent's code |
| Agent Key | A key created on the other agent's Channels → Agent Keys page |
| Description | What the other agent does and when to call it |
| Loading Text Type | How the "please wait" message is produced while the call runs |
| Rules and Response Prompt | How to use and present the reply |
Add it from the panel, then click Save all changes and publish, just like an A2A connection.
Next steps
- Next in this step: Let Other Agents Call Yours, to open the inbound direction.
- Other Agents reference: every field on this screen.
- Next in the journey: Talk by Voice.