Overview
This section takes you from a freshly created agent to one that is live, connected to your systems, and tuned for quality. It is written as a learning journey: four stages, each building on the one before, so you always know what to do next and when you are ready to move on.
If you have not created an agent yet, start with Create Your First Agent and come back here.
What "configuring an agent" means
Every agent starts with sensible defaults. Configuring it means telling it three things:
- Who it is: its name, look, mission, and personality.
- What it knows: the documents, websites, and videos it answers from.
- How and where it works: the channels people reach it on, the systems it can call, and the people who step in when it should not decide alone.
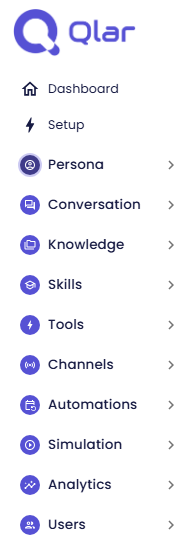
You do all of this in the CMS, in the sidebar menus of your agent (Persona, Conversation, Knowledge, Tools, Channels, Users, and so on).
Draft vs publish, in one line: changes you save go to a draft that you can test in the CMS preview, and your users only see them after you click Publish. See Preview and Publish Changes.
The four stages
Stage 1 · Basics: "my agent answers correctly"
You give the agent an identity, teach it your content, shape how it talks, and publish your first version.
| Page | What you achieve |
|---|---|
| Give Your Agent an Identity | A name, logo, mission, personality, and brand colors. |
| Teach Your Agent | Documents, websites, and videos the agent answers from, with citations. |
| Shape the Conversation | A welcome message, example questions, and chat behaviour. |
| Preview and Publish Changes | A tested version that is live for your users. |
Ready to move on when: you can ask your agent 5 to 10 real questions in the preview and it answers them correctly, in the right tone, with sources, and you have published that version.
Stage 2 · Go Live: "people use my agent"
You put the agent where your users are, decide who can use it, and set up a hand-off to humans.
| Page | What you achieve |
|---|---|
| Embed Chat on Your Website | A chat widget or full page on your own site. |
| Connect to WhatsApp | The agent answering on a WhatsApp number. |
| Connect to Instagram | The agent answering Instagram direct messages. |
| Manage Who Can Use and Build | Control over participants, team members, knowledge permissions, and availability. |
| Hand Off to a Human | Escalation to a supervisor when the agent should not decide alone. |
Ready to move on when: real users can reach the agent on at least one channel, only the right people can use it, and someone is on duty to pick up escalations.
Stage 3 · Extend: "my agent can act"
You let the agent look things up and do things, not just answer from its documents.
| Page | What you achieve |
|---|---|
| Search and Read the Web | Fresh answers from the internet or specific web pages. |
| Connect Your API | The agent calling your own REST API (check an order, create a ticket). |
| Connect an MCP Server | Tools from an MCP server, without writing an API definition yourself. |
| Work With Other Agents | Specialist agents working together. |
| Talk by Voice | Spoken conversations with your agent. |
Ready to move on when: the agent completes at least one real task end to end (for example, looking up an order status) in the preview, and you are happy with how it chooses when to use each tool.
Stage 4 · Advanced: "personal, automated, optimised"
You make the agent remember people, work on its own schedule, and squeeze the most out of answer quality.
| Page | What you achieve |
|---|---|
| Remember Each User | The agent remembering useful facts about each person, with consent. |
| Automate Tasks | Tasks that run on a schedule or when a condition is met. |
| Fine-Tune Answer Quality | The right model, context size, retrieval settings, and clean chunks. |
There is no "done" here: come back to this stage whenever you want better answers or less manual work.
Recommended path for your first agent
You do not need every page to launch. For a first agent, this path gets you live quickly:
- Profile and Behavior: name your agent and write a specific mission.
- Documents: upload two or three of your most-asked-about files.
- Introduction: write a welcome message and a few example questions.
- Preview and Publish Changes: test with real questions, then publish.
- One channel: Embed Chat on Your Website or Connect to WhatsApp.
Add the rest (appearance, escalation, tools, automation) once real conversations show you what is missing. The Analytics & Logs section helps you spot those gaps.
How this section differs from Help and Using Plugins
| Section | Use it when you want to... |
|---|---|
| Configuring Your Agent (this section) | Learn what to do, in what order, and why. Pages are tutorials with examples. |
| Help | Look up a specific screen or field. Help mirrors the CMS sidebar one page per menu item, field by field. |
| Using Plugins | Set up a ready-made plugin, such as SQL Database Reader, Chat Form, Reminder, Dynamic Table, or Public Documents. |
A good habit: learn a feature here first, then keep the matching Help page open when you need the full list of fields.
Next steps
- Start Stage 1: Give Your Agent an Identity.
- Haven't created an agent yet? Go to Create Your First Agent.