Give Skills Files (Artifacts)
Open in CMSArtifacts are files your agent owns, such as reference notes, reply templates or pictures, grouped into folders. A skill can be given whole folders, and while that skill is open the agent can read the files in them or show the pictures. In this tutorial you create a folder, upload a file, and let a skill use it.
Before you start
- Read Teach Your Agent Skills to understand what a skill is.
- Have the file ready. For text the agent should read, use a plain-text file such as
.mdor.txt. - You know how to test and publish changes. See Preview and Publish Changes.
How artifacts work
- Files live in folders, and access is given by folder. You never give a skill a single file. You tick a folder in the skill, and the skill may read every file in it, including files you add later.
- The agent reads a file only while a skill that may read its folder is open. When the skill closes, its file access goes with it.
- The agent refers to a file as folder/file, for example
reservation-notes/seating-and-deposits.md. Use the same path when you mention a file in a skill's instructions. - Each folder is private or public. A private folder is for reference material the agent reads. A public folder is for pictures the agent shows in its answers: anyone who has a file's URL can open it, without signing in.
- Artifacts are not Knowledge. Knowledge documents are searched on every question. An artifact is read only when a skill that uses it is open, so it suits material that only matters for one procedure.
Step 1: Create a folder
- In the agent sidebar, open Skills → Artifacts. The page has Folders on the left and the selected folder's files on the right.
- Click New folder.
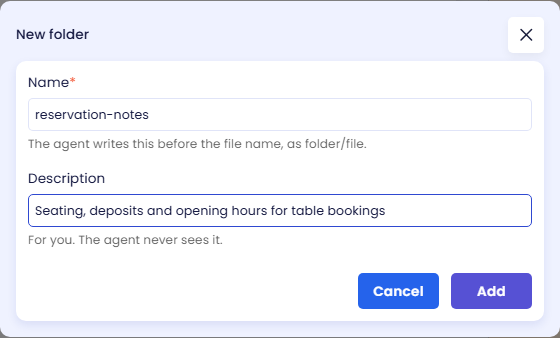
- Fill in the dialog:
- Name (required): the folder name the agent writes before the file name. Up to 60 characters, no slash, unique on this agent. Example:
reservation-notes. - Description: a note for you about what belongs in the folder. The agent never sees it. Up to 200 characters.
- Name (required): the folder name the agent writes before the file name. Up to 60 characters, no slash, unique on this agent. Example:
- Click Add. The folder is saved straight away. A new folder is always private.
Step 2: Upload a file
- Select the folder on the left.
- Click Upload file and choose a file. A message confirms when it is added.
- The file appears with its name, its path as folder/file, and its size.
Changes on this page are saved immediately; there is no Save button.

For Brew, the file seating-and-deposits.md holds the table types, the booking rules and the opening hours:
# Brew & Chat Cafe: seating and deposits

## Tables
- Window bar: 2 seats per spot, no booking needed.
- Garden tables: up to 4 guests.
- Long table (indoor): 6 to 10 guests. Bookable for groups only.

## Booking rules
- Bookings open 14 days ahead.
- Groups of 6 or more pay a deposit of Rp 50.000 per guest, deducted from the bill.
- Deposits are refunded in full when the booking is cancelled at least 24 hours before.
- A table is held for 15 minutes after the booking time.
...
File types and limits
| File size | Up to 5 MB per file. |
| Text the agent reads | Plain text, such as .md, .txt or .csv. The agent reads a private file as text, so keep documents like PDFs or Word files in Knowledge instead. |
| Pictures the agent shows | Put them in a public folder. The agent shows a picture by putting its URL in the answer. |
| How much is read at once | The first 16,000 characters of a file. If a file is longer, split it into smaller files so the agent can read the part it needs. |
| Same file name | Uploading a file with the same name into the same folder replaces the old one. |
| Folders | Up to 30 folders per agent. |
Step 3: Let a skill read the folder
- Open Skills → Skills and click the pencil icon on the skill (or Add skill for a new one).
- Under Folders this skill may read, tick the folder. Each folder shows whether it is public or private.
- In Instructions, say when to use the file, with its full path. For example: "Check the time against the opening hours in reservation-notes/seating-and-deposits.md."
- Click Apply (or Add), then Save.
If there are no folders yet, the dialog shows a note pointing you to the Artifacts page. See Create a Skill for all the other fields.
Make a folder public or private
Select the folder and click Make public or Make private, then confirm.
- Make public makes every file in the folder readable by anyone who has its URL, without signing in. Use it only for pictures the agent is meant to show, never for internal material such as price lists or procedures.
- Make private stops the files being reachable by URL. Pictures already shown in past conversations stop loading.
Changing visibility moves the files to different storage, so any file URL that was already shared stops working.
Edit or delete
- Edit a folder: click the pencil icon on the folder to change its name or description. Visibility is changed on the folder itself, not in this dialog. If you rename a folder, update the file paths in your skills' instructions too.
- Delete a file: click the bin icon next to the file and confirm. A skill that mentions it can no longer read it.
- Delete a folder: click the bin icon on the folder and confirm. Every file in it is deleted too, and the confirmation names the skills that lose access.
Check the result
- Open Preview and start a new chat.
- Ask something only the file can answer. For Brew: "Can I book a table for 8 people this Saturday at 7 pm?"
- The answer should use facts from the file, here the long table for groups and the Rp 50.000 deposit per guest.
Artifacts are saved to your agent's draft, so Preview uses them right away. Click Publish when you are ready, so the live agent uses the same files. See Preview and Publish Changes.
Next steps
- Next in the journey: Talk by Voice, to let people speak with your agent.
- Create a Skill: write the procedure that uses your files.
- Field-by-field reference: Artifacts.