Create a Skill
Open in CMSIn this tutorial you give your agent its first skill: a written procedure it opens when a conversation calls for it. You will switch skills on, fill in every field of the skill, test it in Preview, and publish it. The example is a Table reservation skill for Brew, the agent of Brew & Chat Cafe.
Before you start
- Read Teach Your Agent Skills to understand how the agent decides to open a skill.
- If the skill should read reference files, upload them first. See Give Skills Files (Artifacts). In this example, the folder
reservation-notesholds a file with Brew's seating rules, deposits and opening hours. - You know how to test and publish changes. See Preview and Publish Changes.
Step 1: Switch skills on
- In the agent sidebar, open Skills → Skills.
- Turn on Give this agent skills. The settings and the skill list appear below the switch.
- Check the two settings. The defaults suit most agents:
- Keep a skill open for (messages): how many messages a skill stays open after the agent opens it. Default 5, from 1 to 50. If the subject comes back later, the agent simply opens the skill again, so a short value is usually right.
- Skills open at once: how many skills one conversation can have open. Default 3, from 1 to 6. When one more opens, the oldest is let go.
Both settings are about cost: an open skill is sent with every message until it is let go.

Step 2: Add the skill
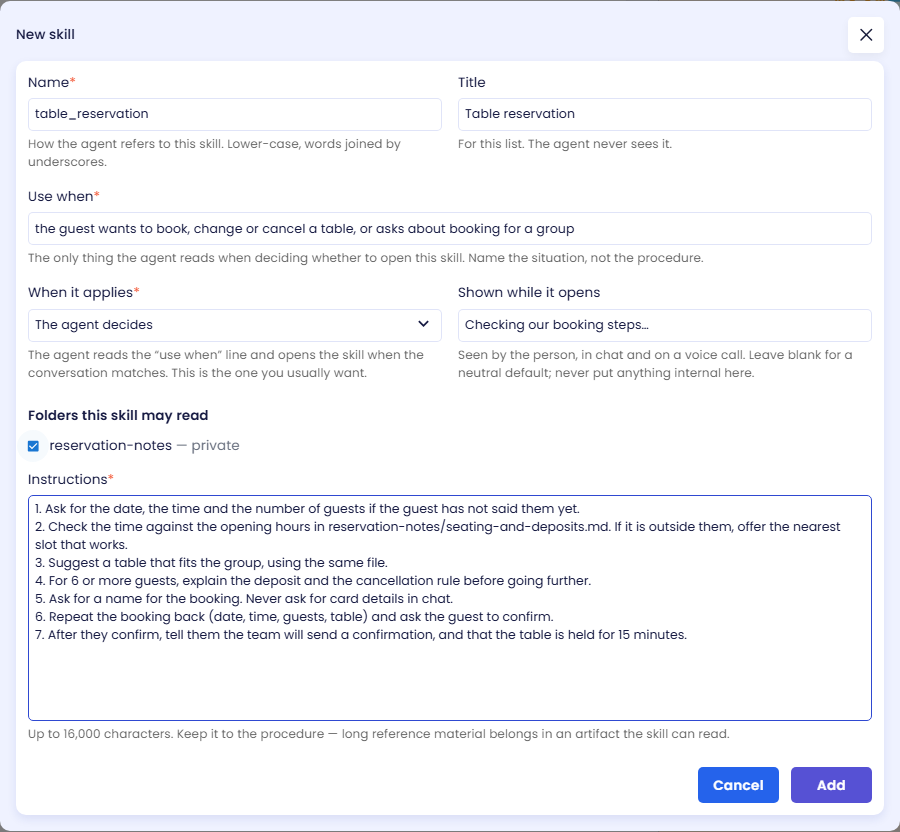
Click Add skill. The New skill dialog opens. Fill in the fields:
| Field | What to enter | Example |
|---|---|---|
| Name (required) | How the agent refers to the skill. Lower-case letters, digits and underscores, starting with a letter, up to 64 characters. It must be unique on this agent and cannot be the name of a built-in tool. | table_reservation |
| Title | A readable name for the skill list. The agent never sees it. Up to 120 characters. | Table reservation |
| Use when (required) | The situation in which the agent should open this skill. Up to 200 characters. See the tips below. | the guest wants to book, change or cancel a table, or asks about booking for a group |
| When it applies (required) | The agent decides, When a keyword appears, or Always in force. See Step 3. | The agent decides |
| Shown while it opens | A short text the person sees in chat and on a voice call while the skill opens. Leave it blank for a neutral default. Never put anything internal here. Up to 60 characters. | Checking our booking steps… |
| Keywords | Only for When a keyword appears: comma-separated words, matched anywhere in the message, not case-sensitive. | |
| Folders this skill may read | Tick the artifact folders whose files this skill may use. Each folder shows whether it is public or private. | reservation-notes |
| Instructions (required) | The procedure itself, written for the agent to follow. Up to 16,000 characters. See Write good instructions. | (see below) |
Click Add to put the skill in the list. Nothing is stored yet.
Write a good Use when line
The Use when line is the only thing the agent reads when it decides whether to open the skill. It never sees the instructions until the skill is open.
- Name the situation, not the procedure. Good: "the guest wants to book, change or cancel a table". Weak: "booking procedure with deposit rules".
- Use the words your users use. People say "book a table" or "reserve", not "reservation workflow".
- Keep each skill to one kind of situation. If two skills have similar Use when lines, the agent may open the wrong one.
Write good instructions
- Write numbered steps in the order the agent should follow them. Say what to ask, what to check, and when to stop.
- Point to files by their path. Write the folder and file name exactly as they appear on the Artifacts page, for example
reservation-notes/seating-and-deposits.md, and say at which step to use them. - Keep reference material out of the instructions. Long tables, price lists and templates belong in an artifact. The instructions should hold the procedure only.
- Say what not to do. For example "never ask for card details in chat".
The instructions used for Brew:
1. Ask for the date, the time and the number of guests if the guest has not said them yet.
2. Check the time against the opening hours in reservation-notes/seating-and-deposits.md. If it is outside them, offer the nearest slot that works.
3. Suggest a table that fits the group, using the same file.
4. For 6 or more guests, explain the deposit and the cancellation rule before going further.
5. Ask for a name for the booking. Never ask for card details in chat.
6. Repeat the booking back (date, time, guests, table) and ask the guest to confirm.
7. After they confirm, tell them the team will send a confirmation, and that the table is held for 15 minutes.
Step 3: Choose when it applies
| Option | What happens | Use it when |
|---|---|---|
| The agent decides (default) | The agent opens the skill when the conversation matches the Use when line. | Almost always. This is the normal way skills work. |
| When a keyword appears | The skill opens whenever the person's message contains one of your keywords. | As a safety net, when the agent keeps failing to open a skill that it should. |
| Always in force | The skill is never opened: it is always applied, in every conversation. | Only for a short rule that really applies to every conversation. It is paid for on every message. |
Step 4: Save
- Click Save at the bottom of the page and confirm.
- The skill appears in the list with its title, a chip with its name, a chip with When it applies, how many folders it may read, and its Use when line.
The switch, both settings and the whole skill list are saved together. If something is wrong (for example a duplicate name), the message lists every problem at once.

Check the result
Saved skills are in your agent's draft, so you can test them in Preview before anyone else sees them.
- Open Preview and start a new chat.
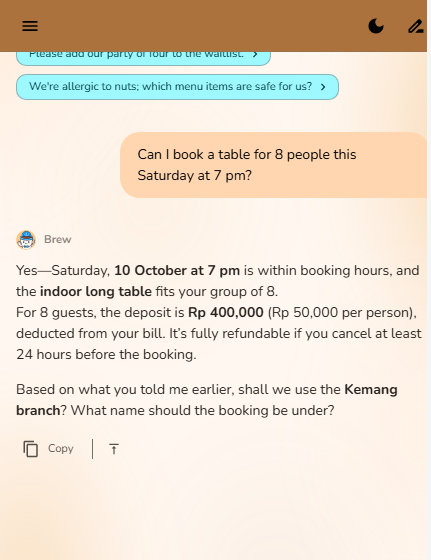
- Send a message that matches the Use when line, for example: "Can I book a table for 8 people this Saturday at 7 pm?"
- The agent should follow the procedure. In this example Brew suggests the long table, explains the deposit for a group of 8 from the file, and asks for a name.
- Try a message that does not match, for example a menu question. The agent should answer normally without the booking steps.
If the agent does not open the skill, make the Use when line closer to how people actually ask, then save and try again in a new chat.
Step 5: Publish
Skills and their instructions are saved to the draft. Click Publish in the top bar when you are happy with the result, so that the live agent starts using the skill. See Preview and Publish Changes.
Edit, remove or switch off skills
- Edit a skill: click the pencil icon next to it, change the fields, click Apply, then Save. Its instructions load into the dialog when it opens.
- Remove a skill: click the bin icon and confirm, then Save. The skill's instructions are deleted with it. Conversations that have it open stop using it on their next message.
- Switch all skills off: turn off Give this agent skills and Save. Your skills stay in the list, ready for when you switch it back on.
- Reached the limit: Add skill is disabled when the agent has as many skills as your organization allows (8 by default, at most 16).
Remember to Publish after each change so the live agent follows it.
Next steps
- Next in this step: Give Skills Files (Artifacts), to give your skill reference files or pictures.
- Next in the journey: Talk by Voice.
- Field-by-field reference: Skills.