Availability
Open in CMSAvailability decides who is allowed to talk to your agent at all: anyone with the link, or only the people you invited. In this tutorial you will choose the right setting, decide whether users must log in, and check that it works.
Before you start
- You have Owner access to the agent. The Availability menu is not shown to contributors.
- If you plan to make the agent Private, add the people who should keep access as members first. See Team Members and Contributors.
- You know how to publish changes. See Preview and Publish Changes.
Step 1: Open the Availability page
Open Users → Availability in the left sidebar. The Agent Availability page has two settings.
Step 2: Choose Public or Private
In Agent Availability, pick one of the two options:
| Option | Shown as | Who can chat |
|---|---|---|
| Public | Available for all users | Anyone can use the agent by visiting its URL. People who chat show up in Participants. |
| Private | Available for invited user only | Only users who were added as members can use the agent. Anyone else is refused. |
The text under the field confirms which mode is selected.
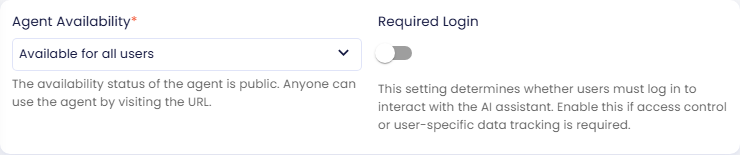
Example: a customer-service agent on your website should be Public. An internal policy assistant for your staff should be Private, with your staff added as members.
Step 3: Decide whether users must log in
Turn on Required Login if users must sign in before they can chat with the agent. Use it when you need to know who is asking, for example to keep a reliable history per person or to apply permission codes.
A Private agent always needs to know who the user is, so anonymous visitors cannot use it either way.
Step 4: Save and publish
- Click Save and confirm. You should see Agent availability successfully updated!
- Click Publish at the top of the CMS so the live agent uses the new setting.
What moved elsewhere
This page used to hold more settings. They now live at the organization level and are handled by an organization Owner or Admin:
| Setting | Where it is now |
|---|---|
| Admin Key | Organization → Agents → Manage. See Admin Key. |
| Deleting the agent | Organization → Agents → Manage. See Deleting an Agent. |
| Cloning the agent | Organization → Agents → Manage. |
| Leaving the agent as a contributor | Users → Contributor. See Team Members and Contributors. |
Check the result
- Open the agent's chat link in a private browser window, without signing in.
- Public with Required Login off: you can chat right away.
- Required Login on, or Private: you cannot chat without signing in.
- For a Private agent, sign in with an account that is a member: you can chat. Sign in with an account that is not a member: access is refused.
Next steps
- Next in the journey: Hand Off to a Human, so a supervisor can take over conversations the agent should not handle alone.
- Embed Chat on Your Website: put your public agent on your site.
- Availability reference: every field on this screen.