Team Members and Contributors
Open in CMSYour agent's team has two layers: members, the colleagues who are allowed to use the agent, and contributors, the Builders who are allowed to configure it. In this tutorial you will add members, give them permission codes, and check who can work on the agent.
Before you start
- The people you want to add are already users of your organization. If not, invite them first: see Users & Invitations. A user does not need any organization role to become an agent member.
- If some knowledge should only be visible to certain members, create the permission codes first in Knowledge Permissions.
- You understand the organization roles (Owner, Admin, Builder, Billing). See Roles & Permissions.
Members and contributors at a glance
| Members | Contributors | |
|---|---|---|
| What they get | Access to use this agent, plus optional permission codes | Access to configure this agent in the CMS |
| Who can be one | Any user of the organization, including users with no role | Organization users with the Builder role |
| Who adds them | The agent's owner, from Users → Members | An organization Owner or Admin, from Organization → Agents → Manage Contributors |
| When it matters most | When the agent is Private (only members can chat) or has restricted knowledge | Whenever more than one person builds the agent |
Organization Owners and Admins can manage every agent in the organization automatically. They never need to be added as contributors.
Part 1: Add members
Step 1: Open the Members page
Open Users → Members in the left sidebar. The Agent Members page lists the current members with their User Name, Email and Permissions.

Note: The Members menu is only shown to people with Owner access to the agent.
To find someone in a long list, click Search Members, type part of a name or email in Search name/email, and click Apply (or press Enter). Reset clears the search.
Step 2: Find the people to add
- Click Add Member. The Add Members page opens.
- Type a name in Search by name and click Search (or press Enter). Leave the box empty and click Search to list your organization's users.
- Tick the checkbox next to each person you want to add. You can select several people at once.
If nobody matches, the page shows No organization users found. Check the spelling, or make sure the person has accepted their organization invitation.
Step 3: Give them permission codes (optional)
If the agent has permission codes, a Permissions for new members box appears. Pick one or more codes in Select permissions. The same codes are given to everyone you selected in Step 2.
Example: you select the three people from the HR team and choose
HR-ONLY. All three can now get answers from documents tagged withHR-ONLY, while other users cannot.
Step 4: Add them
Click Add N Members (the button shows how many people you selected). You return to the Agent Members list, where the new members appear. People who were already members are skipped.
Part 2: Change or remove a member
- In the Agent Members list, click the member's row. The Member Roles & Permissions window opens.
- User Name and Email are read-only. Change the codes in Permissions as needed.
- Click Save.
To remove the person from the agent, click Delete Member at the top of the same window. The button is not shown on your own entry, so you cannot remove yourself this way.
Permission codes are attached to a conversation when it starts, so a change applies to the member's next conversation.
Part 3: See who can configure the agent
Open Users → Contributor. This page shows, for the current agent and organization:
| Section | Who is listed | Can you change it here? |
|---|---|---|
| Organization Owners | Everyone with the Owner role | No, they always have access |
| Organization Admins | Everyone with the Admin role | No, they always have access |
| Agent Contributors | Builders who were given access to this specific agent | Only through Manage Contributors (see below) |
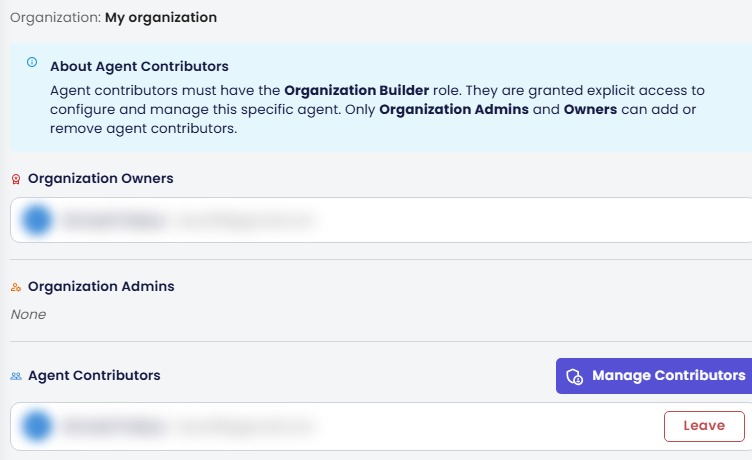
If you are an organization Owner or Admin, a Manage Contributors button appears next to Agent Contributors. It takes you to the agent's contributor page under Organization → Agents, where you can add or remove contributors and decide what each one may see (conversation history, remembered participant data, automations). The full walkthrough is in Managing Agent Access.
Being a contributor lets someone build the agent. Reading conversations and reading what the agent remembers about people are separate permissions, set per contributor. See Conversation history access and Participant data access.
Part 4: Leave an agent as a contributor
If you are a contributor and no longer work on an agent, you can remove your own access:
- Open Users → Contributor.
- In Agent Contributors, find your own row and click Leave.
- Type the agent's name to confirm, then confirm.
The Leave button appears only on your own row. Agent owners have no row in Agent Contributors, so they never see it: an owner hands the agent over or deletes it from the Organization → Agents tab instead. See Transferring an Agent.
Check the result
- Ask a new member to sign in and open the agent's chat. They should be able to chat, even if the agent is Private.
- If you gave them a permission code, ask a question that only restricted content can answer. The member should get the answer, while a user without the code should not.
- Open Users → Contributor and confirm that the right Builders are listed under Agent Contributors.
Next steps
- Next in this step: Knowledge Permissions, to create the codes you hand out to members.
- Availability: make the agent Private so only members can use it.
- Members reference and Contributor reference: every field on these screens.